Sunday, November 25, 2012

Rubbing resistor bad!


Here is a perfect example of what designers or even a hobbyists need to consider when placing circuits into metal enclosures. The picture shows a resistor that has been rubbing against the metal chassis inside a Vox amplifier. This resistor was part of the input circuit for the amp. The owner of the amp was experiencing buzzing and cutout of his guitar while playing. He would then adjust his cord going into the amp to releave the symptom. What he was actually doing was slightly moving the resistor away from the metal chassis. The process of plugging and unplugging the cable and moving it around on worsened the situation. All that needed to be done was simply bend the resistor down so that it was no longer touching the metal chassis. One thing to remember, if the resistor has been rubbing for awhile is maybe possible that the resistance had been changed. So I made sure to check it with an ohm meter just to be sure.

Fender Strat Pickup Repair

Pickup sounding weak or cuts out when you tap it? The following discovery and repair may save one from buying a new pickup, but at a cost.

 "image taken from www.musiciansfriend.com"

Fender's SCN Samarium Cobalt noiseless pickups, are a set designed by the Fender Mod Shop. These pickups are designed to provide a huge bite, but noiseless.  The magnets are a combination of traditional magnets and samarium magnetic material. A little off topic, but according to www.duramag.com; "Samarium Cobalt, rare earth magnet, is made up of largely Cobalt and Samarium and it is the most expensive magnetic material to manufacture and to fabricate." I had no idea there was such a material called samarium alloy.

First, let me explain the symptoms of this American strat that was brought to me.  The middle pickup would cut out while playing and cause all kinds of noise and crackling. By tapping the pickup the sound would come back and then shortly after it would start all over again; very annoying! I personally never used the middle pickup on my strat, but on this strat the noise would be present even when switching between the neck and bridge pickups. This is a real problem.

Like all strats, the electronics are mounted to the pick guard. I relieved the tension on the strings, unscrewed the pick guard screws, and wiggled the pick guard away from the guitar. My first thought was that the pickup's solder joints were making contact with conductive paint that is in the guitars body cavity causing the pickup to ground out at that point. So my first solution is to add strips of tape on the back of the pickups and make sure that the pickups are at the proper height. This did not solve the issue. I was still getting crackling and had to tap the pickup to get the sound to come back.
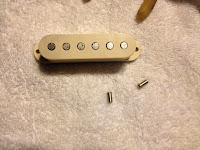
Next, I decided to disassemble the pickup to get a better look at what is going on inside. Originally when I measured the resistance of the entire pickup coil, I would get nothing and when I would shake it a bit the meter would bounce to around 6 Kohms. According to the manufacturer the pickup should measure roughly 6.5 Kohms for the ST-MD model. It was fairly easy to take apart. Just needed to pop out the metal inserts for the pickup screws on each side and pull off the plastic cover to reveal the pickup coils and magnets.


After close inspection, I saw that a wire was laying across one coil and actually looked like it had melted the coating on the coil. This would make sense as the coil was terminated at that point on the coil causing the issue. This would reduce the resistance and the amount of turns. In fact, if it was touching so that the wire made contact with some where close to the beginning of the coil winding; there would be virtually nothing to pickup sound. It would be similar to shorting the ground and signal wire of your guitar together or using a piece of wire for a pickup. I carefully lifted the wire from the coil and de-soldered this wire from the pad and cut it loose. Then I took a measurement and the coil measured 12.7 Kohms. This is in-fact the true resistance of the coils as the design of this pickup allows a user to change the configuration of the pickup with a switch system. The noiseless feature that the pickup provides is from arranging the coils in a stacked formation. With a switching system, you can choose to use the pickup in a true single coil mode or in the mode that is similar to having a humbucker; which provides the noise canceling feature. This switching feature is called coil tapping.


To finish the repair I took a small piece of solid core wire and soldered it to the contact on the side between the coils and through the solder pad. I then made another check to confirm that the pickup did still have resistance and put everything back together. I tuned up the strat and played it for a bit to make sure the noise was truly gone and it was. Of course there is a downside to what had happened. The pickup no longer has the ability to cancel noise and is permanently a true single coil. So there is light hum like all single coils have, but switching between the pickups doesn't give the loud noise that was present before. The owner is happy so that is all that counts!


Friday, April 6, 2012

iPod classic or paper weight?


Had a guy from work bring me an iPod classic to look at. The thing would not turn on and wouldn't do anything when plugged in to a USB port. He tried every possible way to reset it and couldn't find the problem.

I took it home and cracked it open. I couldn't find any loose ribbon cables or signs of damage. I suspected that maybe the LCD screen was bad but I would eventually be able to play music from it even if the screen is bad. Looking at port on the iPod I noticed a small shiny strip of gold colored metal sticking up. I thought to myself that this has to be it.

I carefully bent the strip down using a combination of a jewelers screwdriver and a paper clip. What ever this pin was it was grounding to the inside of the port causing the unit not to function.

Eventually I got it to lay down. I put the iPod back together and proceeded to plug it in to a charger. After a few minutes I gave it a go and everything seems to be working just fine.

This goes to show that sometimes electronics can be fixed easily. One needs only to be observant and inspect carefully.

Tuesday, March 27, 2012

Apps

I just added a google blog app to my phone. There is absolutely an app for everything from flashlights, to games where you throw ice down a plumbers crack! In a world of full schedules and no time to reach the personal computer one's cellphone is the most readily available tool.

Sunday, March 18, 2012

Gibson GA-8T tube Amplifier

Photobucket

Photobucket

I had someone come to me with a proposition to work on an old amp. Once I got my hands on it and looked up what the amp was, I found that it was a Gibson Discoverer GA-8T. It's a nifty little combo tube amp with built in tube tremolo. According to what I've found this amp was produced from 1962 to 1966 as part of the Crestline series of Gibson tube combos. I have never had my hands on a working amp this old as of yet. This man described to me that the amp would shock him and at times the amp would get extremely hot.

I first gave it a good look over on the outside and noticed two tares in the speaker, and the wire used going to the speaker was a 24guage solid core wire like you would find in telecommunications. I also knew that old tube amps didn't have a grounded three prong power cables for the direct grounding of the chassis; which can be dangerous.


Photobucket
Photobucket


After actually removing the screws and getting to the components inside. I found a scorched 1K resistor connected to the rectifier tube. When I tapped it, snap! The resistor split in half. Eureka! I've found the problem! I replaced the resistor and the power cord grounding the chassis.

Photobucket

On to the speaker. The speaker had two tares. What better way to fix these, but with good ole paper towels, glue, and a little spray paint. I cleaned the area, and saturated a section of paper towel with glue. Then carefully I covered the holes and smoothed them out. After they were completely dry, I gave them a few shots of black spray paint. Next I replaced the flimsy wire with 16guage speaker wire.


Photobucket
Photobucket
Photobucket
Photobucket
Photobucket


Amp turned out great and the guy was happy. I did mention to him that he probably should replace the caps and the power switch seemed to be going bad. The switch is too cool, because it is a rotary on-off switch as opposed to a toggle. These switches aren't common. A few weeks later I did eventually get a call to replace the switch and to do the cap job, which I am currently pricing parts out for. Why let a sweet almost 50 year old amp die!

Tuesday, December 15, 2009

CryBaby Wah Mods.

Photobucket

I didn't mind the fact that my original Dunlop Crybaby Wah pedal sounded a little weak, but what I didn't like was it had a switching problem and when I would play in bypass, my guitar didn't sound as great as it did with the wah out of my signal path. With that said and a little inspiration from Mr. Emerson, I decided to modify my wah pedal. There are actually quite a few mods that can be done to this pedal and many websites to research. Here are a list of websites I checked out:
www.wah-wah.co.uk
www.diyguitarist.com/DIYStompboxes/WahMod.htm

I broke the modifications into two main categories to make it really simple. One I wanted true bypass so that my guitar tone didn't sounds bad when the wah pedal isn't engaged and I also wanted Led on/bypass indication as well. Two I wanted to change the way the wah sounded.

The true bypass is done using a DPDT foot switch or a 3PDT foot switch. The advantage of a 3PDT switch is I can have simple led indication. True bypass literary means when the effect is disengaged the signal path is just a wire.

animated true bypass


As you can see in the figure above all three switch components are switched at the same time and there are two states. Most effects have one led for when the effect is engaged, but I wanted two leds. Call it overkill, but I like having the indicators this way. 3PDT foot switches can be found on ebay or if you can find a parts supplier.
http://cgi.ebay.com/3PDT-guitar-effects-pedal-footswitch-true-bypass-mod_W0QQitemZ150372119024QQcmdZViewItemQQptZGuitar_Accessories?hash=item2302e071f0

For my wah pedal two components need to be desoldered and a trace needs to be cut.


Photobucket


Second, I wanted to mod the sound of the pedal. When the pedal sweeps from the bass to treble, its not that smooth and the mid-range is not at all how I want it. There are a few mods and even one that doesn't require soldering. The mods I did are from this website: http://www.wah-wah.co.uk/. I'm still in the process of tayloring the sound, but the mods I have done are the Vocal Mod with the 68K resistor, Gain & Bass response with a 330ohm resistor, and the Volume mod with a 56K resistor.

I also moved the sweeping pot back a bit to have more of the bass range. This mod can be done just with a phillips screw driver. All you do is unscrew the brace that is against the sweeping bar that has ridges on it to moves the sweeping pot. Then you turn the pot a bit to have either more bass or treble in your foot motion.

Both the websites have some simple and great information on Crybaby Wah mods and should be checked out.


Photobucket
Photobucket
Photobucket
Photobucket
Photobucket


Photobucket
Photobucket


Photobucket
Photobucket
Led holes drilled
Photobucket
Photobucket
Photobucket

"All life is an experiment. The more experiments you make the better."
- Ralph Waldo Emerson

Sunday, December 13, 2009

Krank Distortion "Distortus Maximus" Pedal Repair. Why isn't there a zener diode in this thing?

I got this pedal from a client. I had no clue what was wrong with it from my first inspection. I plugged in and powered it up. No sound when engaged. When disengaged I got a clean tone, but this is due to the true bypass switching! I haven't seen true bypass on a commercial pedal. True bypass has been done by guitar players and tone freaks to have an unaffected guitar tone when the pedal is disengaged. Once I opened it up I noticed that the main IC, a LM386 audio amp, was crooked in the DIP socket. A DIP socket!!! What?!? The major guitar pedal manufactures don't put DIP sockets in there electronics! Well this company goes all out in design. After removing the IC I see that the socket is completely damaged. It looked like it was melted. I assume that the IC got really hot, blew, and melted the DIP socket plastic. If you look close it's actually pin 6 of the DIP socket that is melted. Pin 6 on the LM386 is the supply voltage pin.


Blown LM386 Audio Amp and melted DIP Socket
Distortus Maximus Guitar Pedal


What caused this? Really I would think that larger current from the wrong power supply did the trick. From what I saw the pedal doesn't have a zener regulator to protect it. This would actually be an improvement on Krank's part if they added it. Maybe I should send then an e-mail and share this idea with them. After switching out the DIP socket and a new LM386 the pedal sounds awesome. This repair job is a great example why adding a zener diode on the power supply input of the pedal can save money and the life of your guitar pedals.